The joist rules for Flexigas are the same Building Regs and TRADA safe zones you already follow for copper. Notch only in the top of the joist, near the supports (0.07 to 0.25 of the span from each bearing), depth no more than 0.125 of the joist depth. Drill holes on the neutral axis, in the middle third of the span, diameter no more than 0.25 of the joist depth, at least 100mm clear of any notch and no closer than three hole diameters apart. Never notch a joist shallower than 100mm or deeper than 250mm. With engineered, metal-web or I-joists you do not cut anything: use the manufacturer's existing service holes. Protect the tube from nails and screws with a 1mm steel plate or 50mm of depth. Support to DN (DN15 1.2m, DN22 and DN28 1.8m, DN32 to DN50 2.5m). Pull a continuous coil to cut joints, keep clear of electrical cables, and sleeve through solid walls and floors. Roof spaces and floor voids without ventilation count as unventilated voids, so use Flexigas DS or add ventilation.
A practical routing reference for Gas Safe registered engineers running Flexigas Corrugated Stainless Steel Tubing through joisted floors and ceiling voids on domestic and light-commercial gas work. No marketing copy. Just the safe zones, the numbers, and the things that fail a job. Standards are BS 6891:2015 (for DN15 to DN32) and IGEM/UP/2 (for DN40 and DN50), the same standards your copper installs already follow.
1. Run with the joists or square to them, never diagonal
Flexigas in joisted floors and roof spaces runs in the direction of the joists or at 90 degrees to them. Diagonal runs are not permitted, same as copper, because a diagonal run forces notches and holes into positions the safe zones do not allow. Before you reach for a drill or a saw, decide which you are doing: notch near the supports, in the top of the joist; drill on the neutral axis, in the middle of the span. The two zones do not overlap, and the rules below keep them apart.
2. Notching and drilling solid timber joists
A notch removes material from the top, near the supports, where bending stress is highest. A hole removes material from the centre of the depth, on the neutral axis, where bending stress is lowest. Put each in the wrong place and you compromise the floor. The figures below are from the Installation Manual (Figures 1A to 1D) and follow the Building Regs and TRADA safe zones. First, the joists to leave alone: joists less than 100mm deep or greater than 250mm deep shall not be notched. A shallow joist has too little material to give up; a deep joist is usually a designed member, so treat it as engineered and check Section 3.
Notches (top edge, near the supports)
- Position: between 0.07 and 0.25 of the span (L) from each support. Notches belong near the bearings, never in the middle of the span.
- Depth: where both drilling and notching occur in the same joist, notch depth is no more than 0.125 of the joist depth (D). For top notching on its own, depth no more than 0.15D, positioned between 0.1L and 0.2L.
- Length: a notch is no longer than 0.25L.
- Bottom notching, where used, is no more than 0.15D deep and sits between 0.1L and 0.2L from each support.
Holes (neutral axis, middle third of the span)
- Position: on the centre line (neutral axis) of the joist, in the middle third of the span. Drill through the depth, not near the top or bottom edge.
- Diameter: no more than 0.25 of the joist depth (D).
- Spacing between holes: centres no closer than three times the diameter of the largest hole.
- Clearance from notches: a minimum of 100mm between any hole and any notch. Keep the two zones clear of each other.
The Installation Manual gives the detailed figures. Reference Section 11 and Figure 1A in the Manual rather than guessing, and where Regulations or British Standards conflict with the Manual, the Regulations and Standards take precedence.
Drill hole size for the tube
A safe-zone hole still has to clear the tube. The Manual's recommended drill hole size is 20mm larger than the Flexigas DN size, so DN22 wants a 42mm hole, DN28 wants a 48mm hole, and so on. Where that hole would breach the 0.25D diameter limit on a given joist, the joist is too shallow for that size of tube in that position. Move the run or change the route.
3. Engineered, metal-web and I-joists: do not cut them
Engineered joists are designed members. The web does the work, and cutting it without the manufacturer's sign-off changes the load path. Do not notch, drill or cut a web joist on a guess. Use the openings the manufacturer already provides and follow their rules.
- Metal-web (open-web posi) joists: the pipework passes between the metal webs, through the open triangles the joist is designed around. Pipe supports fix to the top or bottom of the timber flanges, not in contact with the metal. Do not damage the webs.
- Timber I-joists and engineered joists: the pipework passes through the web at the manufacturer's pre-marked knockouts or service holes, per their guidance and Figure 1C of the Manual. Do not notch, drill or cut the timber flanges, and do not exceed the manufacturer's hole size, spacing or position. Do not expose the timber to moisture.
If the existing service holes do not suit your route, the route changes, not the joist.
4. Protecting the tube from nails and screws
The most common way to wreck a concealed gas run is a flooring nail or a plasterboard screw driven through it after you have left site. Two defences, whichever the situation calls for:
- Depth. Where the tube could be penetrated by a 50mm nail or screw, keep it at least 50mm from the face of the board or flooring.
- A steel protection plate. Where you cannot keep that depth, place a 1mm steel plate over the tube between it and the fixing. Same protection copper gets within 50mm of a plasterboard face.
When you re-fix flooring across a joisted run, take special care not to drive a fixing into the tube, and mark the flooring where possible to warn other trades. Where the design allows, route to remove the need for notching solid timber joists at all. If the tube is punctured, bent past its minimum radius, badly crushed or hit by a corrosive material, replace the affected section, do not patch it.
5. Support spacing along the run
Support the tube along its length as you would copper, vertical and horizontal alike. Range is DN15 to DN50, and spacing follows the DN size:
| Flexigas size | Maximum support spacing |
|---|---|
| DN15 | 1.2m |
| DN22 and DN28 | 1.8m |
| DN32, DN40 and DN50 | 2.5m |
In a joisted floor the joists often set the support pattern, but check it still meets the figures above. Fix supports to the timber, not to the webs of an engineered joist.
6. Keep the run continuous to cut joints
This is where Flexigas earns its place in a joisted floor. It comes in long coils (15m, 25m, 50m and longer), so you can pull a continuous run from meter to appliance through the joists with no joints in between, the same way you pull electrical cable. Fewer joints means fewer leak points and fewer concealed connections under a floor you are about to board over. It also keeps you clear of the rule that fittings must stay accessible: a buried or boxed-in fitting is a problem, a continuous length of tube is not. Plan the coil run to land any unavoidable fitting at an accessible point, never mid-span under fixed flooring.
7. Separation from electrical cables
Gas and electrical services share a lot of joisted floors. Keep them apart: run the Flexigas in its own holes and notches, not sharing a hole with cabling, and keep clear separation so the gas tube and any cable are never in contact or crushed together by the floor above. Separate from cables is not the same as earthing. All domestic gas installations, including CSST such as Flexigas, need main equipotential bonding to BS 7671, connected as near as practicable to the point of entry and before any branch. The integrated FG Bond earthing terminal makes that bond faster, but it is a single main bond at the meter, not a bond at every joint.
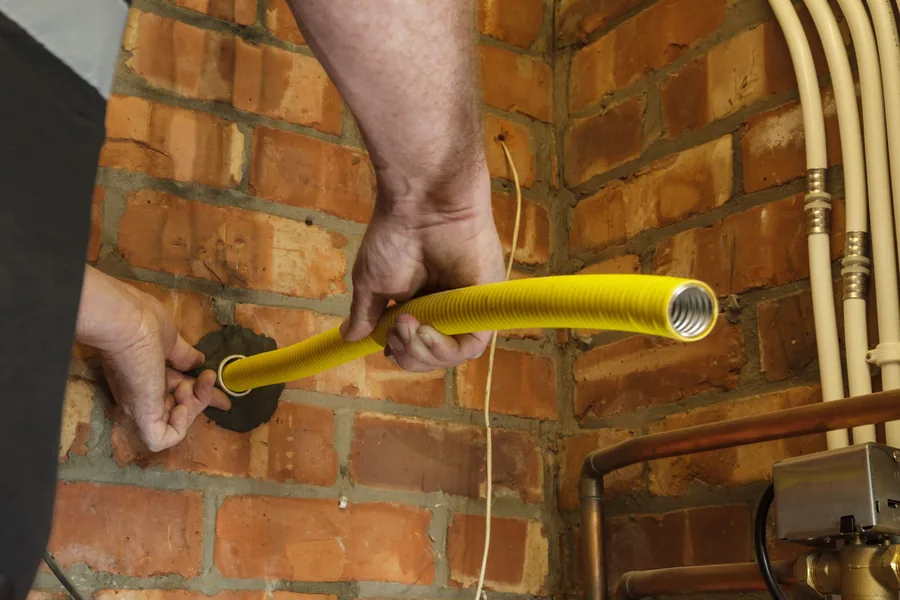
8. Passing through solid walls and floors: sleeve it
A joisted run often has to cross into masonry. Where Flexigas passes through a solid wall or a solid floor, it passes through a sleeve. The sleeve runs the full thickness of the wall or floor, must not impair its fire resistance, and the annular gap is sealed at one end with a flexible fire-resistant compound. Flexigas fittings shall not sit inside the sleeve. Acceptable sleeve materials are copper, steel, polyethylene or PVC. Flexigas DS removes the need for a separate sleeve here: its outer corrugated sleeve meets the BS 6891 and IGEM/UP/2 definition of a sleeve in its own right, so DS does not need an additional sleeve through walls, floors, unventilated voids or unventilated risers. Flexigas is never placed within the cavity of a cavity wall: take the shortest practicable route through and sleeve it.
9. The unventilated-void rule
This one catches people in roof spaces and tight floor voids. Where pipework sits in a void under a floor, within an intermediate joisted floor, or in a roof space with no specific ventilation (a vapour-permeable underlay with no soffit vents, for example), the space is treated as an unventilated void for gas pipework. Minor leakage cannot disperse, so you have two options:
- Use Flexigas DS, which is rated for unventilated voids without a separate sleeve, or sleeve Standard Flexigas through the void.
- Add ventilation per Section 15 of the Manual. Roof spaces need at least two ventilators per space, each at least 50cm² free area: at low level for LPG and LPG/Air mixtures, at high level for natural gas.
Two more roof-space rules worth stating plainly: pipework shall not be laid below or within roof or floor insulation, and pipework shall not be installed within a fire compartment floor that separates one dwelling from another part of the building (the only exceptions are the vented-duct arrangements in Figures 1C and 1D of the Manual).