Almost every Flexigas problem on site is one of the same handful of faults, and almost all of them are caught at the gas tightness test or come back as a callback. The big ones: cutting on a crown instead of in the valley, stripping the wrong number of corrugations, collets that are not seated in the valleys, under-tightening the nut so the last corrugation never deforms against the seat, and taping the joint before you test it. The fixes are simple. Cut clean and square in the valley with a wheel cutter. Expose exactly the last four corrugations. Seat the two semi-circular collets so their ridges sit in the last three valleys. Tighten with two spanners until resistance rises sharply. Test first, tape after. And remember the structural ones that void the BSI Kitemark KM 598726 and your warranty: never mix Flexigas with another manufacturer's CSST, always earth bond per BS 7671, respect the minimum bend radius and support spacing, and sleeve runs through unventilated voids and solid walls or floors (or use DS).
A practical troubleshooting reference for Gas Safe registered engineers fitting Flexigas Corrugated Stainless Steel Tubing. After a decade of Flexigas on UK gas work, the same faults come up over and over. None are catastrophic, but most cost you a failed re-test or a return visit. Here is each one, why it happens, and the fix.
The faults that fail a re-test
These five are almost always caught at the gas tightness test, or worse, they pass on the day and weep later. They all sit in the termination, the one part of the install that genuinely differs from copper. Get the termination right and most of your trouble disappears.
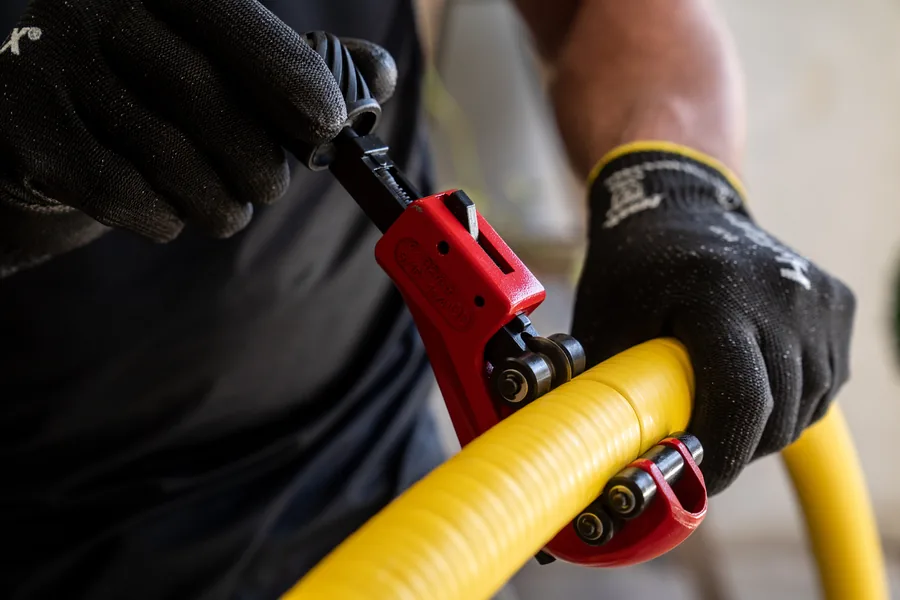
1. Cutting on a crown, not in the valley
The cut has to land in the valley between corrugations, not on a crown. Use a wheel metal pipe cutter, never a hacksaw. Centre the wheel in the valley, rotate steadily, and tighten only slightly on each revolution. The cut needs to be clean, square and circular with no sharp edge. A rough or angled edge will not seat against the brass seat, so the seal never forms.
Fix: re-cut in the valley with a wheel cutter. Crowns crush, valleys cut clean.
2. Stripping the wrong number of corrugations
When you remove the yellow flame-retardant polyethylene cover with the utility knife, expose exactly the last four corrugations of the stainless steel. No more, no less. Too little and the fitting cannot seat fully. Too much and you have created exposed stainless that needs taping later, and the collets can sit in the wrong place.
Fix: stop at four corrugations every time. It is the single number that makes the rest of the termination line up.
3. Collets not seated in the valleys
After the nut goes on first, the two semi-circular collets (the grab rings) sit around the tube so their ridges occupy the last three valleys of the exposed corrugations. If the ridges are not in the valleys, the collets cannot grip the tube and force it forward into the brass seat as you tighten, so the fitting never fully tightens and the seal never forms.
Fix: seat both collets with their ridges in the last three valleys before you bring the nut up. Check it before tightening, not after.
4. Under-tightening the nut
The seal only forms when the last corrugation deforms around the seat inside the fitting. Tighten the nut against the fitting body with two suitably sized spanners, one holding the body, one turning the nut. Tighten progressively until resistance increases significantly. The Installation Manual phrase is "use sufficient torque", which in practice means you feel the resistance rise sharply and then plateau. Stop short of that and the corrugation has not collapsed against the seat, so you have no primary seal. A related fault is single-spanner tightening, which twists the tube instead of compressing the corrugation.
Fix: two spanners, tighten until the resistance rises sharply. And note the seal is dry, metal to metal. No jointing paste, no PTFE tape, no sealant of any kind. Adding tape or paste to the seal breaks the mechanism, it does not improve it.
5. Taping the fitting before the gas tightness test
The silicone tape wrap goes on only after the gas tightness test has passed, never before. If you tape the gap between the fitting tail and the tube before testing, you cannot see a leak at the joint during the test. The whole point of leaving it bare is that any weep stays visible.
Fix: test first, tape after. Then wrap with yellow silicone tape (FG-TAPE) at minimum 50% overlap to give double-layer cover, protecting the exposed stainless from chloride attack.
The faults that cause a callback
These do not always fail on the day. They come back as a corroded joint, a failed bond check, a restricted run, or a Kitemark and warranty problem you would much rather avoid.
6. Mixing Flexigas with another manufacturer's CSST
Direct joining to other CSST systems is strictly forbidden, no matter how similar they look, because the systems are not tested together. Flexigas tubing only ever connects to Flexigas fittings. Section 24 of the Installation Manual is unambiguous: "Flexigas tubing is only compatible with Flexigas fittings. No Flexigas components should ever be connected directly with any other CSST systems despite how similar they may appear." Joining to copper, iron or brass happens through approved BSP thread connectors only.
Fix: genuine Flexigas tube with genuine Flexigas fittings. Mixing brands voids the BSI Kitemark KM 598726 and your warranty.
7. Missing or wrong earth bond
All domestic gas installations, including CSST systems such as Flexigas, must have main equipotential bonding conforming to BS 7671. The most common faults are skipping the bond altogether, or clamping a separate bonding clamp directly onto the stainless tube. The clamp cannot be attached to the Flexigas tubing (the stainless steel) or to any flexible connector near the meter. It may only go on the hex part of the fittings, or on the copper or rigid steel parts of the installation.
Fix: bond per BS 7671 using the integrated FG Bond terminal, which is tested to BS 951:2009 and accepts 1cm to 2cm of stripped copper wire. Connect as near as practicable to the point of entry, before any branch, in an accessible position, with the "Safety electrical connection, do not remove" label fitted.
8. Exceeding the minimum bend radius
Flexigas bends instead of using elbows, but the bend radii are bigger than copper. Minimum 20mm at DN15 (suggested 75mm), increasing to 90mm minimum at DN50 (suggested 125mm). Bend tighter than the minimum and you risk kinking and restricting flow, which means replacing the section. Repeated bending of the same section during the install should also be avoided.
Fix: work to the suggested radius, not the absolute minimum, and never re-bend the same length. If a section has been bent beyond its minimum radius, replace it.
9. Wrong support spacing for the DN
Support spacing follows BS 6891 the same way copper does, and the spacing is set by the size: 1.2m for DN15, 1.8m for DN22 and DN28, 2.5m for DN32 to DN50, vertical and horizontal alike. Spacing clips too far apart leaves the run sagging and unsupported, which is a common pull-up at inspection.
Fix: clip to the spacing for the DN you are running. Add support at direction changes and near fittings as good practice.
10. Running through unventilated voids or solid walls and floors without the required sleeve
With Standard Flexigas, pipework passing through a wall or floor, or through an unventilated void or unventilated riser, must pass through a sleeve (copper, steel, polyethylene or PVC) per Section 14 of the Manual. The common fault is running Standard tube straight through a solid wall or an enclosed void with no sleeve. The exceptions are properly protected dry-lining runs and screed runs covered in the routing sections.
Fix: sleeve the run per Section 14, or use Flexigas DS, whose outer corrugated sleeve meets the BS 6891 and IGEM/UP/2 definition of a sleeve in its own right, so it needs no separate sleeve through walls, floors, unventilated voids and unventilated risers.
Two more worth knowing
Not on the headline list, but they catch people out and both cause slow, corrosive failures rather than an instant test fail.
- Burying fittings. Flexigas fittings are not permitted below ground or directly buried in a solid floor. Terminate at an accessible point first. Where you genuinely need a fitting in the screed, use a removable conduit junction box so it stays accessible.
- Chloride-rich leak detection fluid. Washing-up liquid and most household soaps are too chloride-rich and corrode stainless and brass over time. Use only non-corrosive leak detection fluid suitable for stainless steel. The same logic applies before burial: inspect the cover, repair any pinhole with silicone tape (50% overlap, double layer), then bury, because a hole plus chloride-rich soil starts corrosion.
The pattern behind all of them
Nine times out of ten the fault is in the termination, and it usually traces back to one of three habits: rushing the cut, not seating the collets, or not tightening far enough. If you install copper you already know about 80% of installing Flexigas. The 20% that differs is the joint, and it rewards slowing down for the first few terminations until the sequence is muscle memory. Cut in the valley, four corrugations, collets in the valleys, two spanners until it bites, test, then tape. For the full method, the seven-step termination is in the installation guide, and the technical PDFs are in technical downloads.